Core Data Exchange
Scheduled file import via Secure File Transport Protocol (sFTP)
This common method allows institutions to send large data sets to the platform by saving .CSV "flat" files containing data for Accounts, Demographics, and Courses into a Campus Labs hosted directory via a sFTP connection. The institution must provide the data in the file format indicated by Campus Labs, along with a manifest file which indicates to the platform that the data file is complete and ready to be imported.
Once the data and manifest files are saved to the directory, the platform processes the data file and incorporates the information into its data set. Any errors are displayed via a web interface accessible by the Campus Data Manager (demographics and courses) or delivered back to the institution via email from Campus Labs staff (accounts).
1 Diagram of basic file import process via sFTP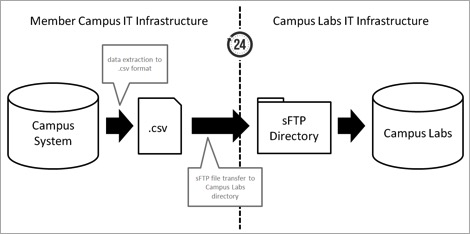
Manual file uploads
Using the same file formatting requirements of the scheduled file import method, this method requires a user to import the data via a web interface. This method is the most limited in terms of flexibility and is generally reserved as a last resort if the more robust options are not possible.
Process
Identify the Campus Data Manager
The first task accomplish is to identify a Campus Data Manager who will be the primary contact at the institution during the process of integration, troubleshooting, and testing. The Campus Data Manager should be familiar with the broader campus data ecosystem, have access to access data from elements of the ecosystem, and have sufficient ability and permission to re-format and send large data sets to the platform.
The Campus Data Manager will be provided with a Campus Labs support contact who can assist with the troubleshooting of issues that arise as well as with a web interface that can assist in identification of data loading errors.
Once a Campus Data Manager has been identified, please register the individual with Campus Labs: http://bit.ly/cldatamgr
Read documentation
Once the Campus Data Manager has been registered with Campus Labs, s/he will receive links to documentation, such as this document, and gain access to data management areas of the web application. The Campus Data Manager should become familiar with the data exchange options and protocols in order to determine which method will work best for the campus.
Determine data exchange method
The Campus Data Manager should use the information that s/he has gleaned from documentation alongside the goals of the primary campus users of the platform to determine the appropriate method for exchanging data.
Request access to exchange data
Using documentation as the primary guide, the Campus Data Manager requests access to either the sFTP directory for scheduled data file imports or public, secret, and subscription keys for access to the web service and API endpoints from the Campus Labs support team.
Send data
Once a method has been identified and access has been granted, the Campus Data Manager should notify Campus Labs support when s/he has sent the first batch of account data to the platform so that both entities can review the exchange and identify any issues.
Troubleshoot any issues
If issues do appear, the Campus Data Manager and Campus Labs support staff work together to resolve the issue.
Finalize recurring data exchange
Once an error-free data exchange has been accomplished, the Campus Data Manager may schedule recurring data transfers via scheduled file imports or web service or API calls.
2 Data exchange integration flowchart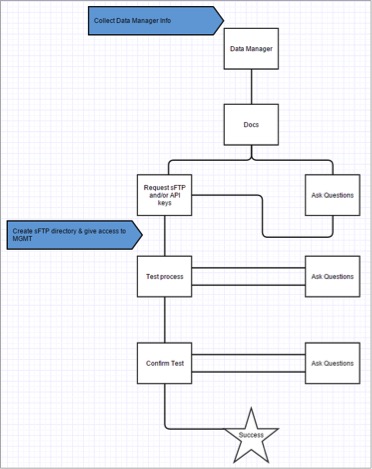
Documentation
Scheduled file import via Secure File Transport Protocol (sFTP)
Setting up an sFTP with Campus Labs
- Email support@campuslabs.com to request an sFTP directory for your campus. In this email, please indicate a phone number to provide the directory secret key information.
-
Once a directory has been set up for your campus. Campus Labs will provide a file server that can act as a temporary storage location for data files that institutions wish to securely transfer to Campus Labs for processing.
In order to connect to the Campus Labs file server, an institution must utilize a file transfer client capable of supporting SFTP, such as the FileZilla client (http://filezilla-project.org) shown in the screenshots included in this document.
Use the following settings:
- Host: ftp.campuslabs.com
- Port: 22
- Protocol: SFTP – SSH File Transfer Protocol
- Logon type: Normal
- User and password are provided via phone
- Do not enter anything for "Account"
- The first time you connect, you will be told that the server's key is unknown. Check the box to "Always trust this host", and you will not be asked about the certificate again.
Importing Accounts via sFTP
Campus Labs will create an "Accounts" and "AccountsImports" folder for your campus. You will need to import the Accounts of your campus into the system before Demographics or Course data. You will receive an error message if done out of order.
The Accounts import must be sent over in a .CSV file and include the following information: External ID, First Name, Last Name, and Email Address. Along with the .CSV file, a "FILENAME.Done" file must be put into the "AccountsImports" folder as well.
Running this Accounts import is not instantaneous and will take at least 15-30 minutes before completing.
Importing Demographics via sFTP
You will need to import the demographic information after accounts have been imported into the Campus Labs system. The demographic information can come before or after you import your course information.
Campus Labs will then create a "Demographics" folder with sub folders for "FacultyImport" and “StudentImport" for your campus.
The templates for both the student and faculty demographic imports are located in the Core Data Management site. Every column header must be included. Fields can be left blank if the users don’t have that information. Once the demographic information is added to each file, it must be dropped into the corresponding folder (student or faculty) with a "FILENAME.done" file.
Campus Data Managers can go into the Core Data Management site to the see the status of the demographic sFTP files. The status for these files will show as complete, incomplete, or failed. The failed files will come with an error attachment.
To ensure the demographic data came through correctly, you can click into users to see if the information matches up. All demographics imports should be a complete "picture" of the student every single time. Any time there is a blank demographic field, we will assume that the previous value is no longer relevant or correct and replace it with an empty value.
Importing Courses via SFTP
You will need to import courses after accounts have been imported into the Campus Labs system. The course information can come before or after you import your demographic information.
Campus Labs will then create a "Courses" folder with sub folders for "AcademicTerm", "Course" "Enrollment", "Instructor", "OrgUnit", and "Section" for your campus.
The templates for all of these course imports are located in the Core Data Management site. Every column header must be included. Fields can be left blank for the users if they don’t have that information. Once the course imports are filled out, they must be dropped into their corresponding folder with the "FILENAME.done" file. These imports can be done in any order, but all of them must be completed.
To verify that all course information has gone in successfully, please follow these steps:
- Go into your Core Data Management site
- Click on the Catalog button under Courses
- Click the section on the left (Courses, Sections, Enrollments, etc.) to jump into your specific data
- Use the Search field and drop down to find the specific information you need to verify
Importing Accounts, Demographics, and Courses through Manual File Imports
We do offer a manual import process to do one-off, small, corrective imports into our systems. Manual imports should not be considered a mechanism for prolonged, regular data importing. Manual imports create additional work for the Campus Data Manager and for Campus Labs staff.
To import Demographics information manually, please follow these steps:
- Go into your Core Data Management site.
- Click on the Import button under Demographics.
- Use the student and faculty templates in the blue box to format your data correctly.
- Once the files are properly formatted and saved as .CSV files, click the "Choose File" buttons and select your student or faculty demographic file.
- Select the Position dropdown to "Student" or "Faculty" based on the import you will be uploading.
- Click the "Import" button.
- Repeat steps 1-6 for the "Student" or "Faculty" template that you didn't upload.
* All demographics imports should be a complete "picture" of the student every single time. Any time there is a blank demographic field, we will assume that the previous value is no longer relevant or correct and replace it with an empty value.
To import Courses information manually, please follow these steps:
- Go into your Core Data Management site.
- Click on the Import button under Demographics.
- Use the student and faculty templates in the blue box to format your data correctly.
- Once the files are properly formatted and saved as .CSV files, click the "Choose File" buttons and select your student or faculty demographic file.
- Select the Position dropdown to "Student" or "Faculty" based on the import you will be uploading.
- Click the "Import" button.
- Repeat steps 1-6 for the "Student" or "Faculty" template that you didn't upload.